|
|
|
|
|
Tailor Template |
|
|
Introduction |
|
Tailor Template for Clarion 5-10... ABC/Legacy. This template extends Clarion Window Editor functionality and allows you to tailor arbitrary non-rectangular windows right in Clarion IDE. Besides this it can make them behave just like MS Media Player. Download Demo. |

|
| Move cursor on top of the picture! |
| The standard way of making non-rectangular windows these days is to design a Window |
| shape outside of IDE as a BMP image and then import it into an application. |
| As it is an external image, it can take a lot of time to align it with other window controls. |
| And even after this, for instance, if you decide to change a window font you need |
| to start those alignments all over again. |
| That is why the Tailor template implements a different approach. |
| With this tool you just draw your non-rectangular window on top of an |
| ordinary one with standard Clarion controls - Ellipse, Rectangle, Round rectangle |
| and Line. All this is right in the Clarion Window Editor. |
| So you can use all the power of Clarion to align these, center them, distribute them and so on. |
| Besides you can exploit another Windows APIs feature - different merging modes for |
| those controls. So in a matter of minutes you can develop absolutely amazing |
| windows similar to the one pictured above. You can find a few other examples in template demo. |
| As soon as you've finished with this non-rectangular window, Clarion IDE |
| will take care of those controls. So if you change a window font, Clarion will automatically |
| resize both the window and all controls including those used by the tailor template. |
| So there is no extra work to be done - all your window controls |
| will always fit perfectly into the window shape you have designed. |
| Main advantages of using template: |
|
Installation |
| Run the installation wizard. It will guide you through a few simple steps. That is it. |
| IMPORTANT: If you are using Clarion 5-6, after selecting Clarion5-Clarion6 directory wizard |
| will offer you to install it into C:\Clarion5(6)\Clarion8 or C:\C55\Clarion8 directory respectively. |
| So don't forget to remove the last \Clarion8. But even if you do forget - no problem. |
| Just uninstall the template and re-run the installation. |
| To start using the template, you'll need to manually register it. |
| Open Clarion (no application must be opened). |
| Go to menu Tools (Setup) -> (Edit) Template Registry -> Register. |
| Select the new template tailor.tpl and then hit Open button. |
| You can find it in Clarion7(8,9,10...)\accessory\template\win |
| for Clarion >= 7 and in Clarion*\Template - for all others. |
| View our animated reminder on how to do this - Registering Template |
|
(built with our JAVA Animated
Help Builder).
|
Using Template |
| Global Extension Template |
| First you need to insert the Global Tailor extension into your application and then repeat this |
| routine for each window to be tailored and then insert the respective local extension. |
| To find them quickly in the list of templates locate them by word "tailor". |
|
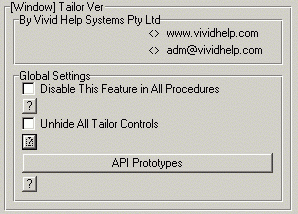
| Unhide All Tailor Controls checkbox is just a development tool. |
| By default the template hides all of them, but you may wish to disable it |
| to ensure that what you've designed matches the final window shape. |
| The template employs a number of API functions so it defines all prototypes for you. |
| If you hit the respective button you can see full list of these prototypes. |
| You will hardly need to touch this area but sometimes you won't be able to |
| compile your application if some other 3rd party template provides one of these |
| prototypes. You will see compile error: "Indistinguishable new prototype: APIname()". |
| So in this case, and in this case only, you should un-tick the respective checkbox |
| to ensure the Tailor template uses another prototype. If the other 3rd party template |
| provides similar functionality, you can do everything other way around. |
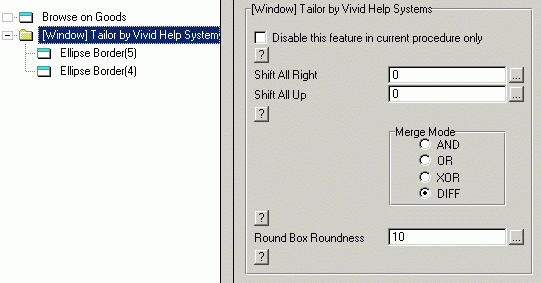
| Local Extension Template |
| As soon as you insert thr Local Tailor extension into your Window you can go directly |
| to Window Editor and tailor your window. You will see a number of tailor controls |
| when you hit Populate -> Control template... menu item or use respective button on |
| the Tool box. Again it is easy to locate them in control list by word "tailor". |
|
| There are no restrictions on the number of those controls so use as many as you wish. |
| The template takes care of almost all position alignments so you will need those 2 Shift |
| prompts only in exceptional situations. For instance, when you have an ordinary |
| window with menu or toolbar. In this case you can either put numbers there |
| (negative or positive) or define some numeric variables and use them (no exclamation |
| mark is needed in front of it!). It will shift the final window shape by this value. |
| All those controls are just ordinary Clarion controls. So only few comments are needed. |
|
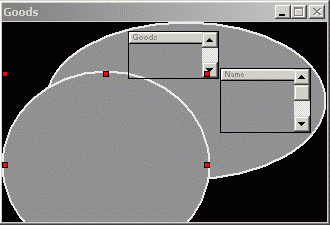
| There is absolutely no difference between Ellipse and EllipseBorder and between |
| Box and BoxBorder or between BoxRound and BoxRoundBorder in terms of functionality. |
| So it depends on your preferences. If you use default merging mode (OR) |
| that is, you want to combine all those controls in one shape, you will probably be happy |
| with those controls having no borders. If you use any other mode, bordered versions of the |
| same controls will suit you better. But if you have already placed some control |
| you can change its property, colour, borders etc. So you can make bordered versions of |
| any control to look like non-bordered and vice versa. |
| See example application for details (Clarion*\Examples\Tailor\Demo\). |
| Or Clarion7(8,9,10...)\Lessons\Tailor in Clarion 7-10.... |
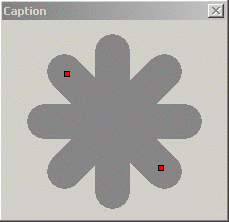
| The tailor template has 2 types of lines. LineRound is just an ordinary Clarion line. So you can |
| use it as a normal Clarion line, change thickness, rotate it etc. Control Template Line is some |
| sort of abstraction (it is slightly darker, so you can tell it from Rounded line). |
| When the template uses this, it removes the round ends. Unfortunately, this |
| is the only way we could find to draw falling rectangles in Clarion Window editor. |
| It is important to stress that the Line control is the only exception! All other tailor |
| controls look exactly the same in Window editor as they do in the final window. |
| The picture below demonstrates how the Line template works: |
|
| In each window procedure the template generates a number of useful routines to |
| manipulate those non-rectangular windows. So you can easily implement windows |
| similar to MS Media Player as well as many others. |
| So here is a short summary of what each of them does: |
|
|
|
|
| See template example for more details. You can find it in |
| Clarion*\Examples\Tailor\Demo\ directory. |
| Some Tips |
| Showing window caption bar |
| Sometimes you will want to show the window caption bar (part or whole). |
| You may need it to provide your users with some of its functionality. |
| For instance, this Globe window pictured above shows part of it to allow |
| users to drag and drop this window just as an ordinary one. |
| Clarion window editor will not allow you to drag any control on top of it. |
| So you can use 3 techniques. First, you select this control and use keyboard |
| arrows to move part of it outside of the window. Second, you go to tailor control |
| property/position and set the latter to move the control where you want it. You will |
| see only part of this control, but Tailor Template still can "see" the whole control. |
| Alternatively, you can use local control prompts Shift All Right and Shift All Up |
| to achieve the same result. |
| Working with Frames |
| The only place where you can put controls in an application frame template is the |
| Toolbar. So you need to do this to tailor the window. You might want |
| to enlarge this toolbar first to allow more room for your drawing. |
| Then, when you have finished the design, you can set it back to its original size. |
| And if you want to show either window caption or status bar you can employ |
| any of the 3 techniques described in the tip above. |
| Handling Windows XP Themes |
| When those are enabled, you will notice that the tailored window gets shifted down. |
| To cure this problem (works in C6 only), you should put this code anywhere |
| in the beginning of your window being tailored: |
|
 |

|
|
Copyright © 2025 Vivid Help Systems Pty Ltd |